Related Links
Radon: A Guide for Installing Affordable Radon Control Systems in New Homes: An Environmental Concern With An Easy Solution!
This page offers radon techniques for new home construction. You can request a print copy from Utah’s Division of Waste Management and Radiation Control at (800) 458-0145.
Radon-Resistant Construction Basics and Techniques
How Does Radon Enter a Building?
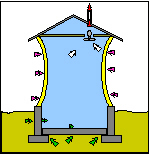
Buildings are typically at a lower pressure than the surrounding air and soil. This causes radon and other soil gases to be drawn into the building.
There are several reasons why this occurs. One reason is the effect that exhaust fans have when removing air from a building. When air is exhausted, outside air enters the building to replace it. Much of this replacement air comes in from the underlying soil.
A second reason that radon is drawn into a building is because when the indoor temperatures are higher than the outdoor temperatures, thermal effects occur inside the building. Just as warm air causes a balloon to rise because the surrounding air is cool, warm air rises within a building and is replaced by cold, dense outside air. Some of the outside air, which is displacing and replacing the interior air, moves through the soil and carries radon in with it.
Does the foundation type affect radon entry?
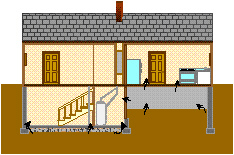
Because radon is literally sucked into a home, any house that is in contact with soils can potentially have a radon problem.
- Basements: Radon can enter through cracks in the slab, especially at floor-to-wall joints and control joints.
- Slab-on-grade houses: Vacuums occur in homes regardless of whether or not there is a basement. Slabs built on grade can have just as many openings to allow radon to enter.
- Crawl space homes: Vacuums that exist within a home are exerted on the crawl spaces beneath them, causing radon and other gases to enter the home from the earthen area below. Even with crawl space vents, a slight vacuum is still exerted on the crawl space. This vacuum is sufficient to draw radon from the exposed earth.
- Mobile and pre-fabricated homes: Unless these buildings are set up on piers without any skirting placed around them, interior vacuums can cause radon to enter these type of homes as well.
Can’t We Just Seal Up Cracks to Keep Radon Out?
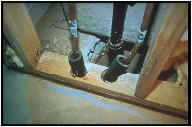
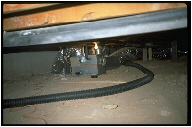
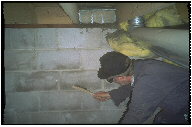
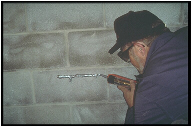
Field research has shown that attempting to seal all of the openings in a foundation is not only impractical but does not work as a stand-alone technique. Because of the vacuums that exist in homes, radon can enter through very small cracks and openings. These small cracks and openings are too small to locate and effectively seal. The photo on the right shows an example of how difficult it would be to access and seal some slab openings and plumbing penetrations.
Realize that even if you did manage to seal everything up, which would be very expensive, building settlement would cause new cracks to occur and negate all of your previous sealing work.
So If You Can’t Seal Out Radon, How Do You Fix a House?
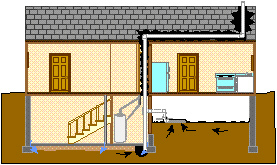
You can install what is referred to as an active soil depressurization system that can extract radon laden soil gases and vent them to a safe location outside of the house. The objective of this type of systems is to create a vacuum beneath the foundation that is greater in strength than the vacuum applied to the soil by the house itself.
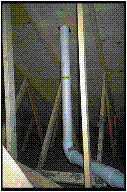
The illustration on the left shows how this is done to a house that has both basement and crawl space areas from which radon can enter. On the basement side, a PVC pipe is inserted into a pit dug beneath the basement slab.
In the case of an existing home or where compacted fill has been used, it is difficult for radon to move through the soil beneath the slab without the use of a fan (located in attic) to draw it out.
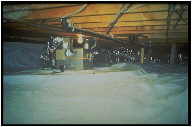
On the crawl space side, a sheet of plastic can be laid on the exposed soil, with the edges sealed against the foundation walls. This allows for the collection of the radon before it enters the crawl space and the living space above, and for exhaustion of the radon above the house.
If Active Soil Depressurization Works, Why Not Wait Until After the Building is Constructed to See If a System is Needed?
While constructing a new home, you have the opportunity to prepare the sub-grade below a slab so radon can move more easily to the riser. Also, the riser is routed through a warm space (such as the furnace flue chase), which will create a draft in the pipe. The combination of these two factors often allows the system to operate passively (without the need for a fan).
Another reason to install a system during construction is that the pipe can be run more easily before the house is finished.
This significantly improves aesthetics and reduces subsequent system operating costs.
What If the Passive Soil Depressurization System is Not Adequate?
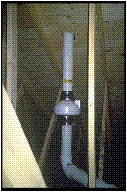
If you plan ahead and make provisions for a future fan, it is easy to add the fan if a post-construction radon test indicates a need to boost the system’s performance.
The two photographs below show how this can be done.
Might We be Incurring Some Liability by Installing Passive Radon Systems?
By installing these systems you are being proactive, which can reduce rather than increase potential liability. The presence of the radon system should be disclosed and the need for the occupant to test the home discussed.
Are There Other Benefits to Installing These Systems?
These systems are very good at reducing moisture influx from the soil. This can reduce the generation of molds and mildews and other indoor air quality problems. In areas where expansive soils are prevalent, this moisture reduction can reduce foundation pressures and prolong the life of the foundation.
Since people are more routinely asking about radon at the time of purchasing a home, a radon reduction system is no longer a stigma to resale, but an asset.
Is There Any Way to Test a Lot Before Building?
Although soil testing is possible, one cannot predict the impact that site preparation will have on the introduction of new radon pathways, or the amount of vacuum a house will create. In addition, the costs to do so are very high when compared to the costs of installing passive radon systems in areas with high radon potentials. With the high incidence of elevated radon in the state, it would be prudent to install the systems described herein.
Treating Slab-On-Grade and Basement Slabs
The key to making a passive radon reduction system work is to insure that radon and other soil gases can easily move laterally beneath the slab. There are three basic methods for improving soil gas collection beneath slabs:
- A four inch layer of clean aggregate beneath the slab;
- A loop of perforated pipe in native soils beneath the slab;
- Interconnected strips of “soil gas collector mat” on top of the sub-grade and beneath the slab.
The method chosen is purely a function of economics and time. The following discussion provides guidance for choosing between the options and describes methods for installation.
Gravel Option
A continuous four inch layer of ½-inch to ¾-inch washed gravel beneath a slab provides a largely unrestricted path in which radon can be collected. This option is generally chosen in regions of the country where gravel is plentiful and economical, or when gravel is specified as a capillary break for water drainage by the foundation engineer.
Treating Crawl Space Areas
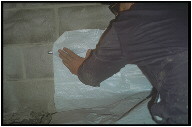
It is best to treat a large earthen area, such as a crawl space, by laying down a sheet of plastic with a perforated collection pipe beneath it, which is later connected to the radon vent riser. Seal the edges of the plastic to the foundation wall. Seal seams and penetrations as well.
Design Parameter—Type of Plastic
The minimum thickness of plastic is a 6 mil polyethylene sheet. However, this material is not very durable if the crawl space will be accessed frequently or if occupants would like to use this area as storage. Typically, a more durable 4 mil cross-linked polyethylene is preferred for its high strength and durability. This high density plastic is also available in white, making the crawl space a lot brighter and user friendly for storage.
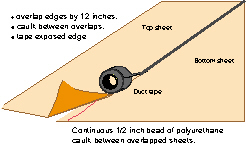
Design Parameter—Amount of Plastic
Be prepared with enough plastic to allow for a 12-inch overlap of seams. Bring the edges up the foundation walls about 12 inches to allow for proper adhesion. It is critical to allow for enough excess plastic so if a vacuum is drawn underneath it, the plastic can conform to the surface of the crawl space floor (like vacuum packaging). Otherwise, you will end up with the plastic stretched like a trampoline over any depressions in the dirt.
Design Parameter—Location of Riser
The riser can be located anywhere in the crawl space – it does not need to be in the center. Place it where it will be convenient for routing the pipe up through the house, as well as for allowing access to the crawl space.
Design Parameter—Pipe Beneath Plastic
Use a minimum of 10 feet of 3-inch corrugated and perforated ADS pipe beneath the plastic sheeting.
Design Parameter—Sealing Edges and Seams
Adhere the plastic to a concrete foundation wall by brushing it with a wire brush and running a ½” wide bead of polyurethane caulk along the wall. Plan on one 11-ounce tube to be able to do an 8-foot edge. It is a good idea to temporarily tape the free edge of the plastic so it will stay in place as the caulk cures. Place rocks on the plastic to keep it from being pulled off the walls as you work on the balance of the crawl space. Seal all seams with polyurethane caulk (8 feet/11 oz. tube).
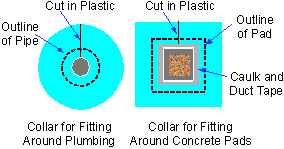
It is necessary to seal around posts and plumbing lines. You can use scraps of plastic to form aprons to fit around these obstructions.
It is easier to seal your large sheet to a flat “apron” section than to try to fit it around the obstacle. Try to plan your seams along rows of piers.
When sealing around plumbing risers, make sure that the clean-out is accessible.
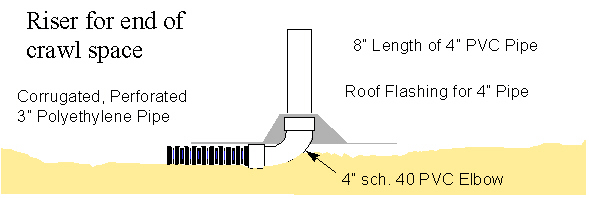
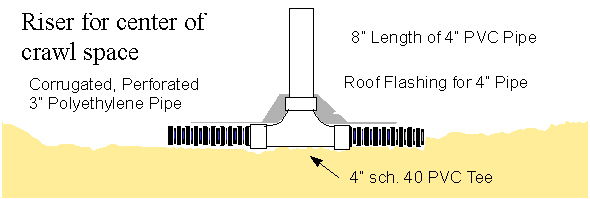
Design Parameter—Riser Installation
The radon vent pipe needs to be connected to the perforated pipe beneath the plastic in a manner that doesn’t allow air leakage. One way to do this is to use two roof jacks. One roof jack goes below the plastic, and one is placed above the plastic, to allow for a flat area to which to seal the plastic to. The riser is sealed by the rubber grommet on the roof jack. The two roof jacks are then secured by sheet metal screws. Depending upon the location of the riser, there may be either a PVC Tee or an elbow beneath the plastic that has a short 4-inch stub of pipe, to which the corrugated and perforated pipe will be connected.
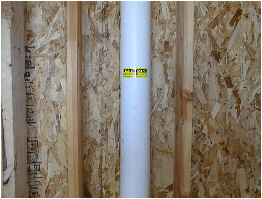
Installation Tip: Label Riser and Plastic
It is a very good idea to label the riser within the crawl space so it is not confused with any other plumbing. It is also a good idea to label the plastic to the effect that, if cut or damaged, it should be patched or replaced.
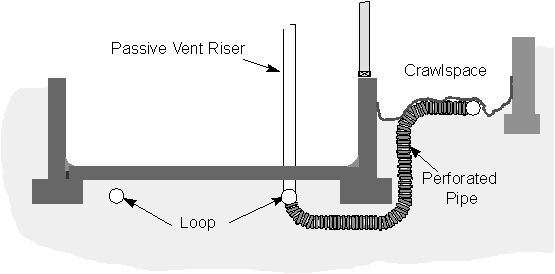
Combining Slab and Crawl Space Systems
It is common to find homes that have both a crawl space and a slab area. A typical configuration is shown in the figure below. Although one could treat the slab and crawl spaces separately, each with its own riser, it is more economical to tie the two together with a single riser. This requires that the pipe which connects the sub-slab area to the crawl space area be placed in the trench of the intervening footing, prior to pouring the foundation walls. This cross-over pipe should be 4-inch perforated and corrugated pipe to prevent accumulation of water, which would prevent air flow. Tape the ends of the cross-over to prevent debris from getting into the pipe, until it is connected to the slab and crawl-space systems.
Note: A pipe loop system is shown beneath the slab in the figure above. A similar method can be used to connect a soil gas collection mat beneath a slab to a perforated pipe beneath the plastic in a crawl space.
Installing Radon Vent Pipe
The purpose of the radon vent pipe is to exhaust radon collected from a slab or crawl space. One of the objectives of a radon system in a new home is to install it in such a manner that a natural draft occurs in the pipe to draw the radon from the soil without the use of a fan. The best way to accomplish this is to route the pipe up through a warm part of the house and exhaust it through the roof. There are a few tricks to this as detailed below.
Design Parameter—Discharge Location
To prevent radon from re-entering the building through an open window, the U.S. EPA has established strict guidelines for the proper location of the exhaust point of the radon vent pipe. This criteria is as follows:
- A minimum of 10 feet above grade
- A minimum of 10 feet away from any building opening that is on a plane less than 2 feet below the discharge.
It is best to route the pipe up through the roof on the back side of the ridge, as you would a plumbing vent. Be sure to run the pipe up through the roof before the roofer installs the roof system. This will allow the roofer to properly flash around the pipe.
¼ inch rodent screen on discharge
Installation Tip—Screen on Discharge
It is a good idea to put a screen on the discharge to keep birds out. There is no reason to put a rain cap on the end of the pipe. In fact, rain caps can force radon (if the system is activated) back down toward openings going into the living space. In other words, do not install a rain cap, but do put a ¼-inch screen on the end.
If you are in a high rainfall area, special devices (available from radon mitigation supply houses) can be put on the discharge to prevent large amounts of rain from entering the system, while still allowing air to vent up and away from the building.
Installation Tip—Support the Pipe
Support the pipe using plumbers’ strapping at least once every 7 feet in horizontal runs, and once every 8 feet in vertical runs.
Labeling System
It is important to label the exposed portions of the pipe, so that during construction other trades people recognize that the pipe is not part of the sewer system. It is also important to label the pipe for occupants and future occupants so they know that it is part of a “Radon Vent System.” Places to label would include:
- Where riser exits slab.
- Where pipe is seen in closets.
- Pipe-run through attic.
- Pipe-run through garage (if it is routed there).
Questions?
Eleanor Divver ([email protected]), Radon Coordinator: (801) 536-0091